How to Peer Virtual Networks using the Hub and Spoke Method with Azure CLI
Read Me
How to Peer Virtual Networks using the Hub and Spoke Method with Azure CLI
Our Use Case
Let’s say your company is now ready to implement virtual network peering. You want to connect systems that are deployed in different virtual networks. To test this plan, you’ll start by creating virtual networks to support the services your company is already running in Azure. You need three virtual networks: The Sales virtual network is deployed in North Europe. Sales systems use this virtual network to process data that’s added after a customer is engaged. The Sales team wants access to Marketing data. The Marketing virtual network is deployed in North Europe. Marketing systems use this virtual network. Members of the Marketing team regularly chat with the Sales team. To share their data with the Sales team, they must download it because the Sales and Marketing systems aren’t connected. The Research virtual network is deployed in West Europe. Research systems use this virtual network. Members of the Research team have a logical working relationship with Marketing, but they don’t want the Sales team to have direct access to their data.
creating Our Resources
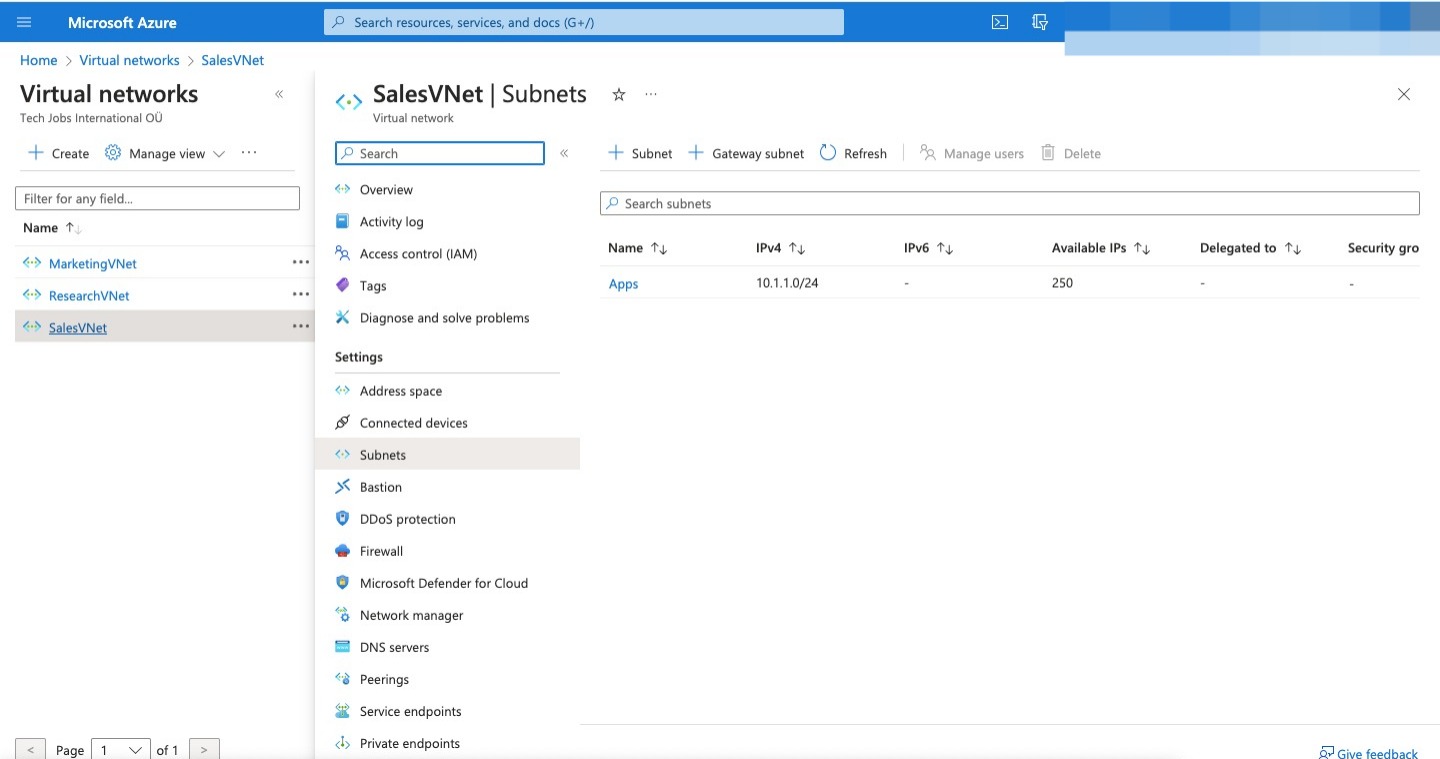
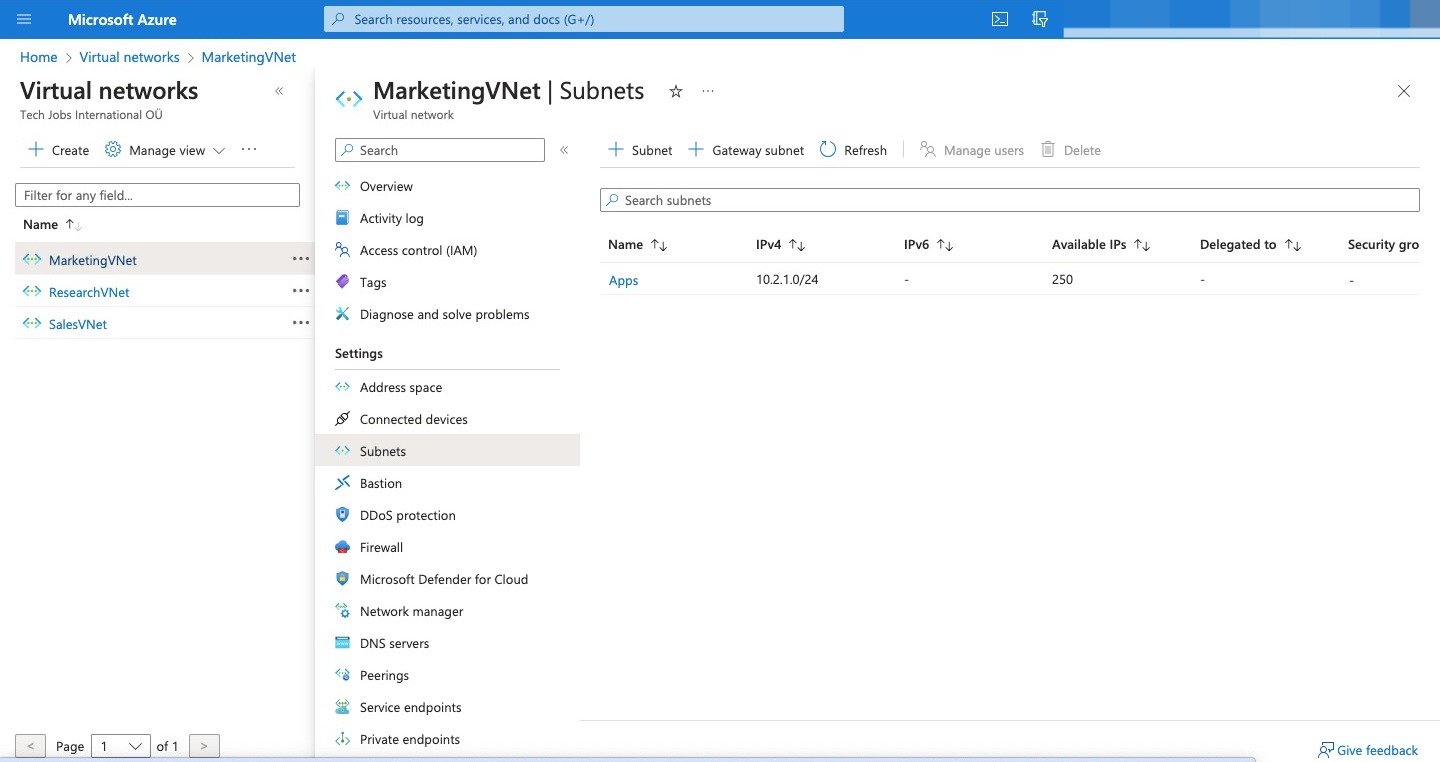
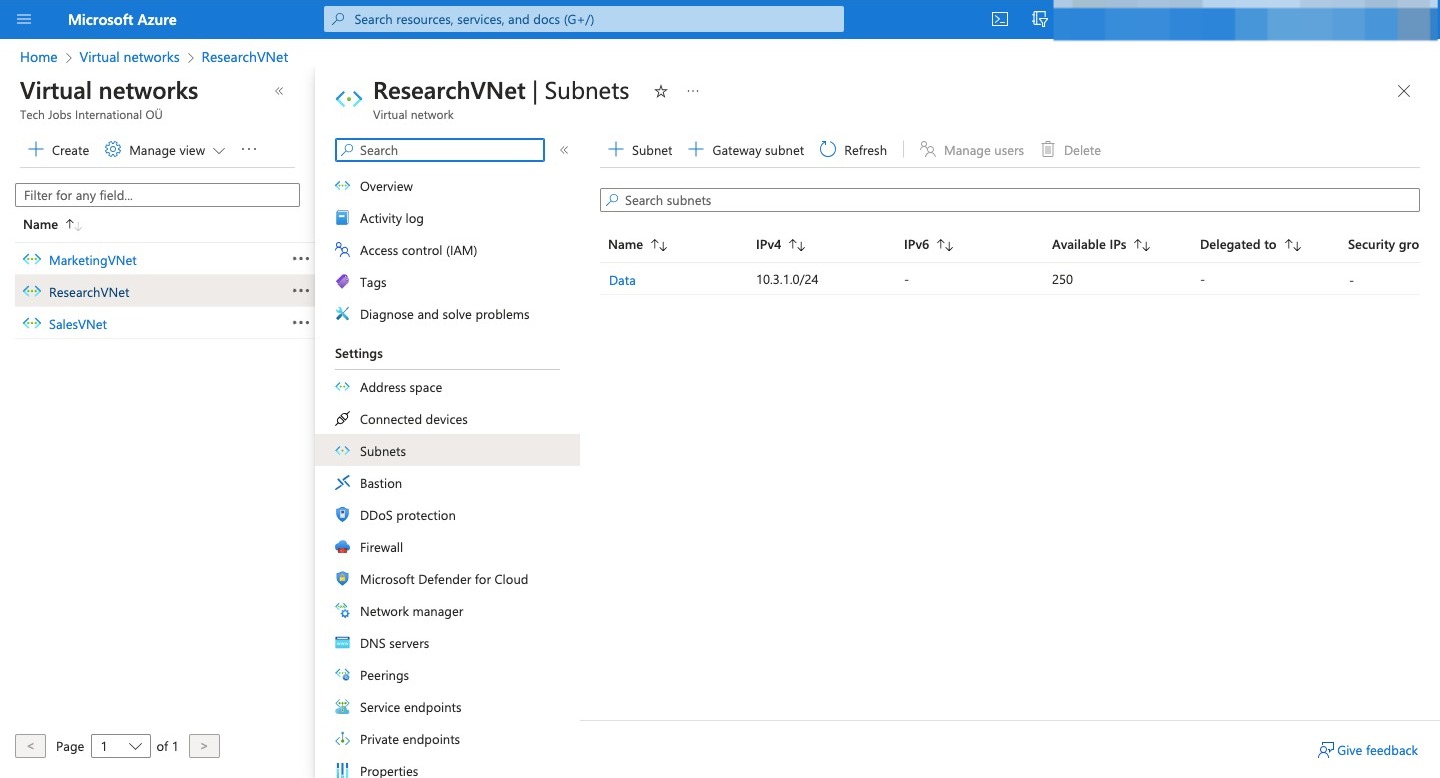
Virtual network Region Virtual network address space Subnet Subnet address space SalesVNet North Europe 10.1.0.0/16 Apps 10.1.1.0/24 MarketingVNet North Europe 10.2.0.0/16 Apps 10.2.1.0/24 ResearchVNet West Europe 10.3.0.0/16 Data 10.3.1.0/24
Using Azure CLI, we create the virtual networks
In Cloud Shell, run the following command to create the virtual network and subnet for the Sales systems: Azure CLI
Copy
az network vnet create \
    --resource-group [ resource group name] \
    --name SalesVNet \
    --address-prefixes 10.1.0.0/16 \
    --subnet-name Apps \
    --subnet-prefixes 10.1.1.0/24 \
    --location northeurope
Run the following command to create the virtual network and subnet for the Marketing systems: Azure CLI
Copy
az network vnet create \
    --resource-group [ resource group name] \
    --name MarketingVNet \
    --address-prefixes 10.2.0.0/16 \
    --subnet-name Apps \
    --subnet-prefixes 10.2.1.0/24 \
    --location northeurope
Run the following command to create the virtual network and subnet for the Research systems: Azure CLI
Copy
az network vnet create \
    --resource-group [ resource group name] \
    --name ResearchVNet \
    --address-prefixes 10.3.0.0/16 \
    --subnet-name Data \
    --subnet-prefixes 10.3.1.0/24 \
    --location westeurope
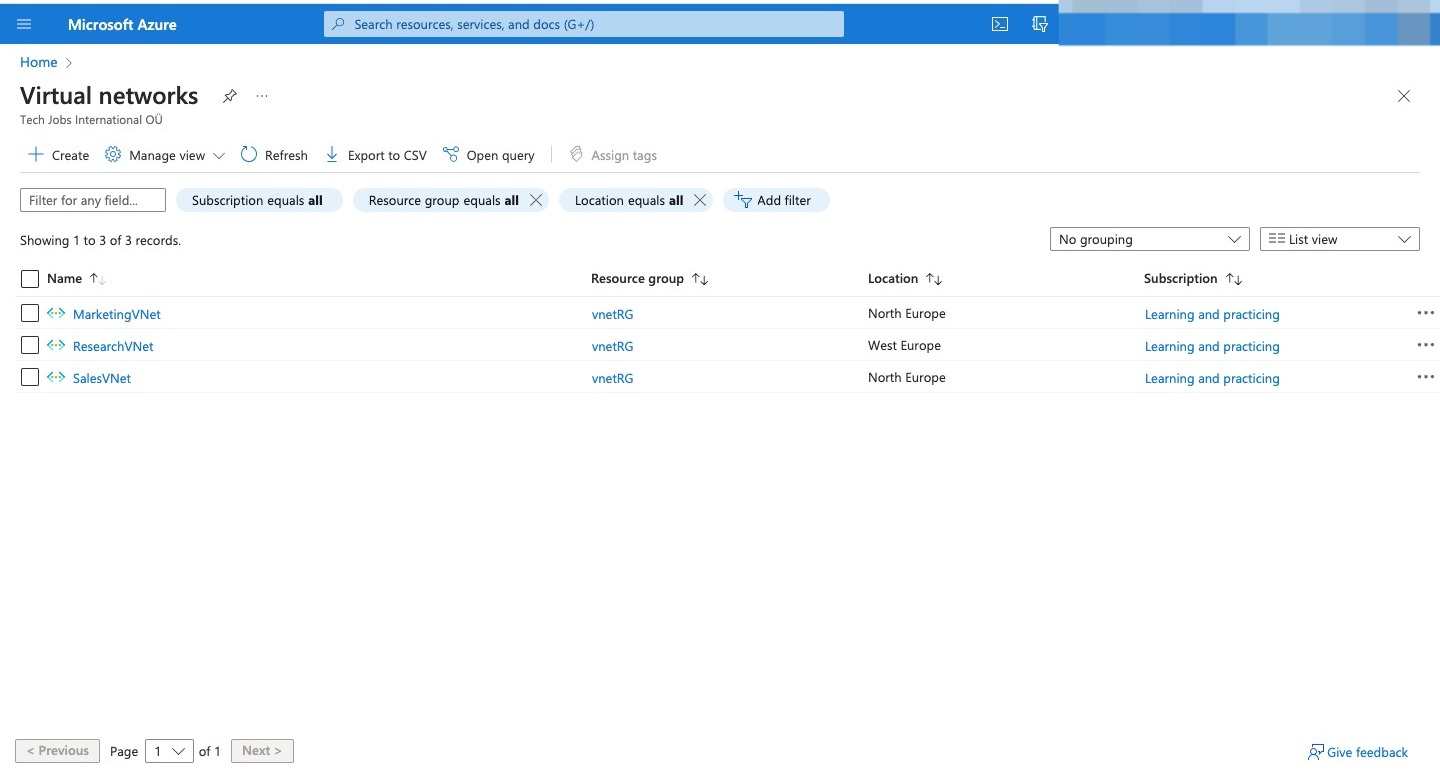
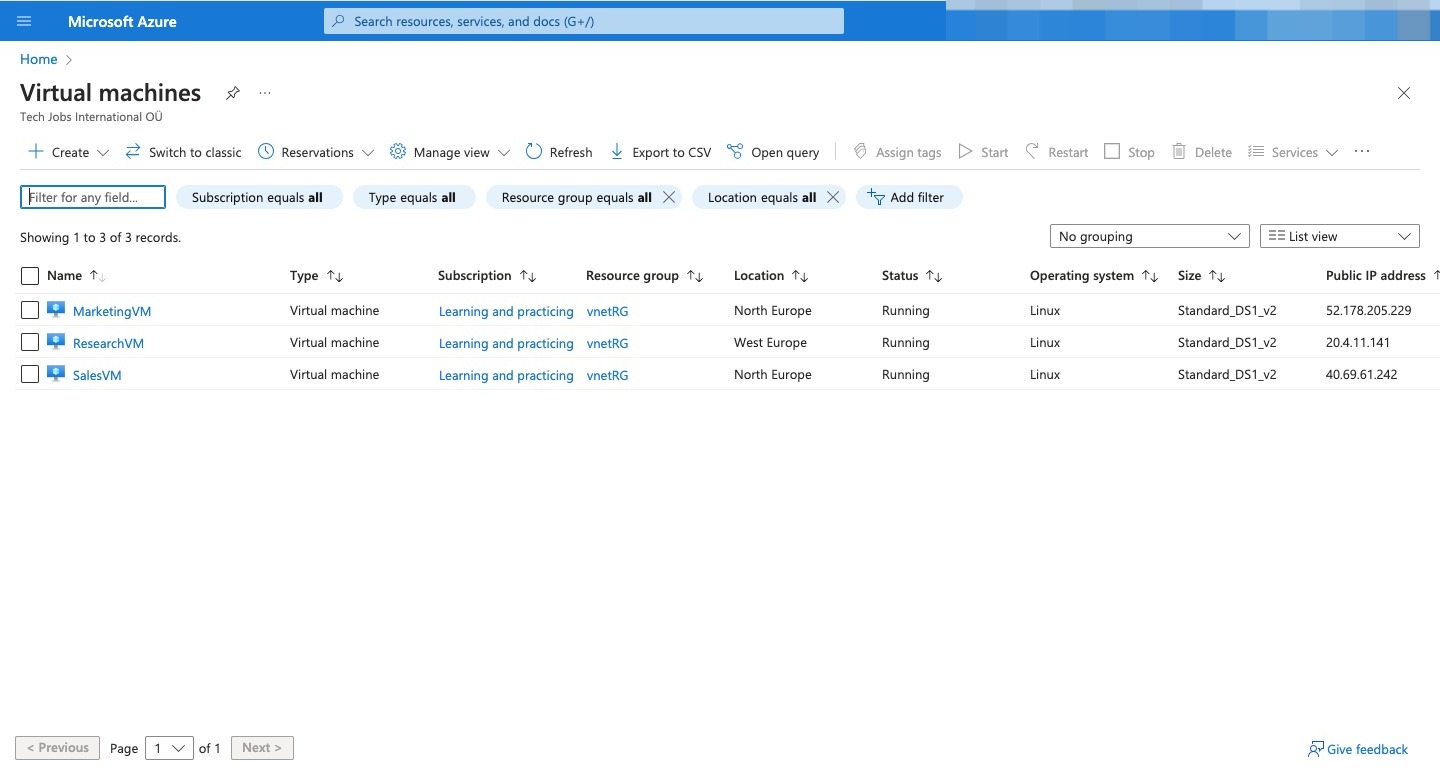
Here are all the VN created
Create some Ubuntu virtual machines (VMs) in each of the virtual networks
In Cloud Shell, run the following command, replacing
Copy
az vm create \
    --resource-group [ resource group name] \
    --no-wait \
    --name SalesVM \
    --location northeurope \
    --vnet-name SalesVNet \
    --subnet Apps \
    --image Ubuntu2204 \
    --admin-username azureuser \
    --admin-password <password>
##### Note The –no-wait parameter in this command lets you continue working in Cloud Shell while the VM is building.
Run the following command, replacing
Copy
az vm create \
    --resource-group [ resource group name] \
    --no-wait \
    --name MarketingVM \
    --location northeurope \
    --vnet-name MarketingVNet \
    --subnet Apps \
    --image Ubuntu2204 \
    --admin-username azureuser \
    --admin-password <password>
Run the following command, replacing
Copy
az vm create \
    --resource-group [ resource group name] \
    --no-wait \
    --name ResearchVM \
    --location westeurope \
    --vnet-name ResearchVNet \
    --subnet Data \
    --image Ubuntu2204 \
    --admin-username azureuser \
    --admin-password <password>
The VMs might take several minutes to reach a running state. To confirm that the VMs are running, run the following command. The Linux watch command is configured to refresh every five seconds. Bash
Copy
watch -d -n 5 "az vm list \
    --resource-group [ resource group name] \
    --show-details \
    --query '[*].{Name:name, ProvisioningState:provisioningState, PowerState:powerState}' \
    --output table"
ProvisioningState of Succeeded and a PowerState of VM running indicates a successful deployment for the VM.
When your VMs are running, you’re ready to move on. Press Ctrl-c to stop the command and continue on with the exe
Configure virtual network peering connections by using Azure CLI commands
In Cloud Shell, run the following command to create the peering connection between the SalesVNet and MarketingVNet virtual networks. This command also permits virtual network access across this peering connection. Azure CLI
Copy
az network vnet peering create \
    --name SalesVNet-To-MarketingVNet \
    --remote-vnet MarketingVNet \
    --resource-group [ resource group name] \
    --vnet-name SalesVNet \
    --allow-vnet-access
Run the following command to create a reciprocal connection from MarketingVNet to SalesVNet. This step completes the connection between these virtual networks. Azure CLI
Copy
az network vnet peering create \
    --name MarketingVNet-To-SalesVNet \
    --remote-vnet SalesVNet \
    --resource-group [ resource group name] \
    --vnet-name MarketingVNet \
    --allow-vnet-access
Now that you have connections between Sales and Marketing, create connections between Marketing and Research. In Cloud Shell, run the following command to create the peering connection between the MarketingVNet and ResearchVNet virtual networks: Azure CLI
Copy
az network vnet peering create \
    --name MarketingVNet-To-ResearchVNet \
    --remote-vnet ResearchVNet \
    --resource-group [ resource group name] \
    --vnet-name MarketingVNet \
    --allow-vnet-access
Run the following command to create the reciprocal connection between ResearchVNet and MarketingVNet: Azure CLI
Copy
az network vnet peering create \
    --name ResearchVNet-To-MarketingVNet \
    --remote-vnet MarketingVNet \
    --resource-group [ resource group name] \
    --vnet-name ResearchVNet \
    --allow-vnet-access
Check the virtual network peering connections
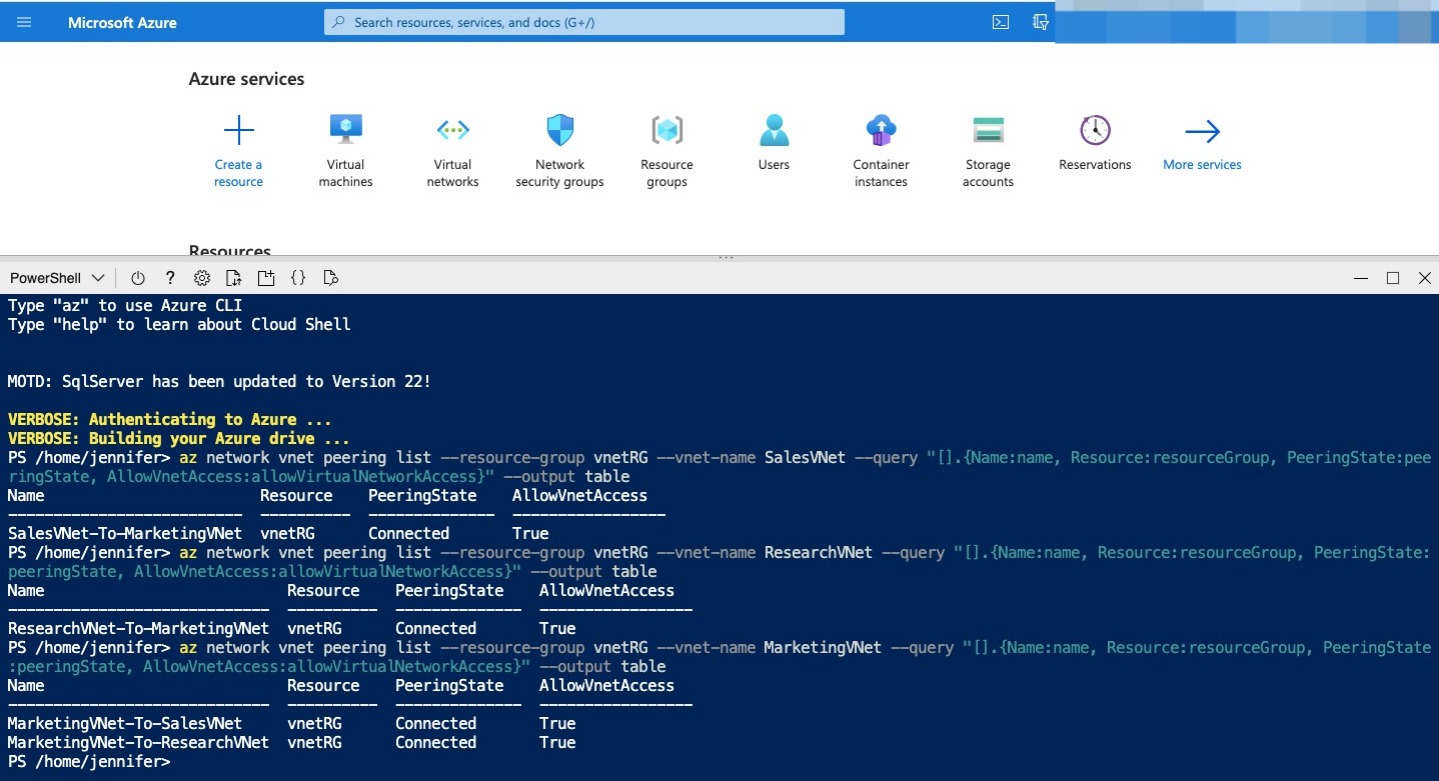
Now that you’ve created the peering connections between the virtual networks, make sure the connections work. In Cloud Shell, run the following command to check the connection between SalesVNet and MarketingVNet: Azure CLI
Copy
az network vnet peering list \
    --resource-group [ resource group name] \
    --vnet-name SalesVNet \
    --query "[].{Name:name, Resource:resourceGroup, PeeringState:peeringState, AllowVnetAccess:allowVirtualNetworkAccess}"\
    --output table
You’ve created only one connection from SalesVNet, so you get only one result. In the PeeringState column, make sure the status is Connected. Run the following command to check the peering connection between the ResearchVNet and MarketingVNet virtual networks: Azure CLI
Copy
az network vnet peering list \
    --resource-group [ resource group name] \
    --vnet-name ResearchVNet \
    --query "[].{Name:name, Resource:resourceGroup, PeeringState:peeringState, AllowVnetAccess:allowVirtualNetworkAccess}"\
    --output table
Again, you’ve created only one connection from ResearchVNet, so you get only one result. In the PeeringState column, make sure the status is Connected. Run the following command to check the peering connections for the MarketingVNet virtual network. Azure CLI
Copy
az network vnet peering list \
    --resource-group [ resource group name] \
    --vnet-name MarketingVNet \
    --query "[].{Name:name, Resource:resourceGroup, PeeringState:peeringState, AllowVnetAccess:allowVirtualNetworkAccess}"\
    --output table
Check effective routes
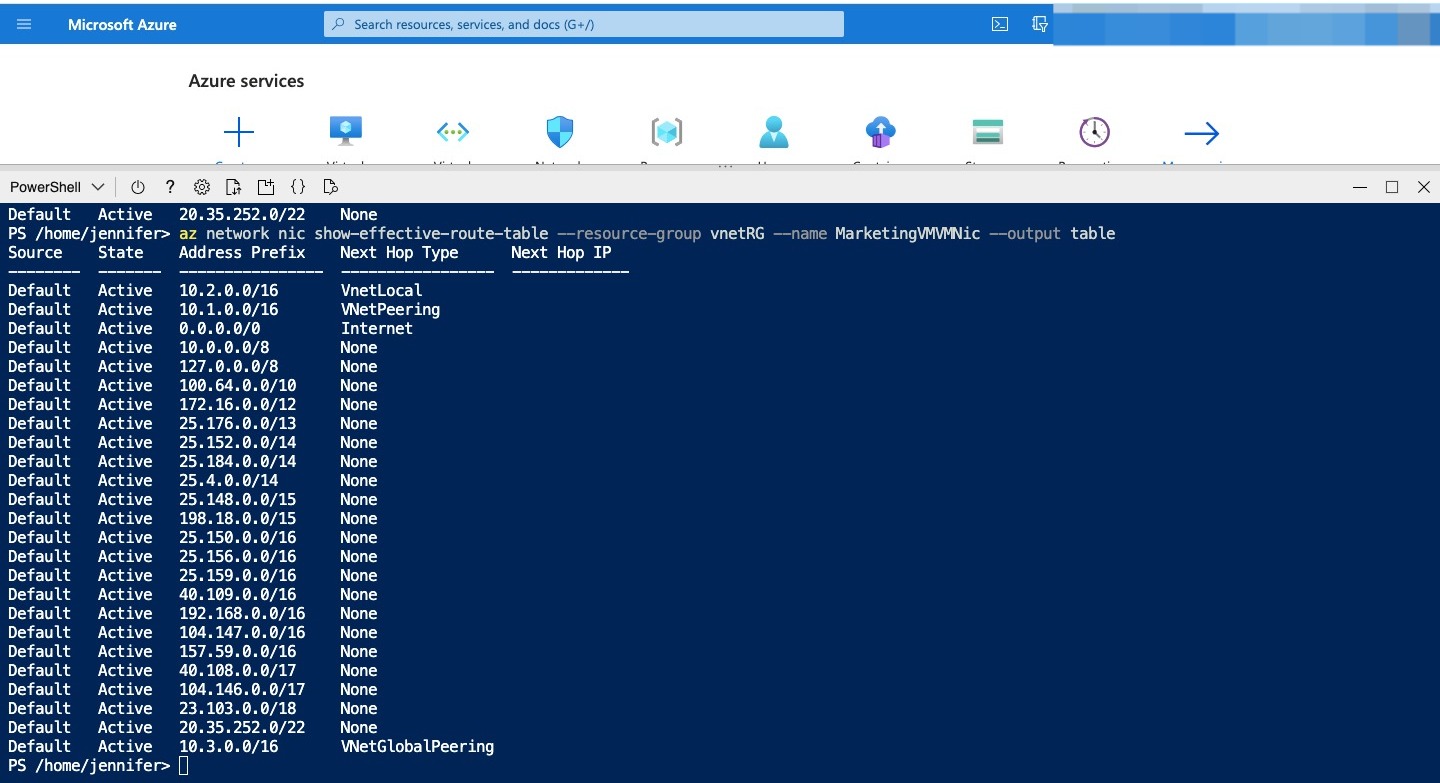
You can further check the peering connection by looking at the routes that apply to the network interfaces of the VMs. Run the following command to look at the routes that apply to the SalesVM network interface: Azure CLI
Copy
az network nic show-effective-route-table \
    --resource-group [ resource group name] \
    --name SalesVMVMNic \
    --output table
The output table shows the effective routes for the VM’s network interface. For SalesVMVMNic, you should have a route to 10.2.0.0/16 with Next Hop Type of VNetPeering. This is the network route for the peering connection from SalesVNet to MarketingVNet.
Output

Run the following command to look at the routes for MarketingVM: Azure CLI
Copy
 az network nic show-effective-route-table \
    --resource-group [ resource group name] \
    --name MarketingVMVMNic \
    --output table
The output table shows the effective routes for the VM’s network interface. For MarketingVMVMNic, you should have a route to 10.1.0.0/16 with a next hop type of VNetPeering and a route to 10.3.0.0/16 with a next hop type of VNetGlobalPeering. These are the network routes for the peering connection from MarketingVNet to SalesVNet and from MarketingVNet to ResearchVNet.
Output
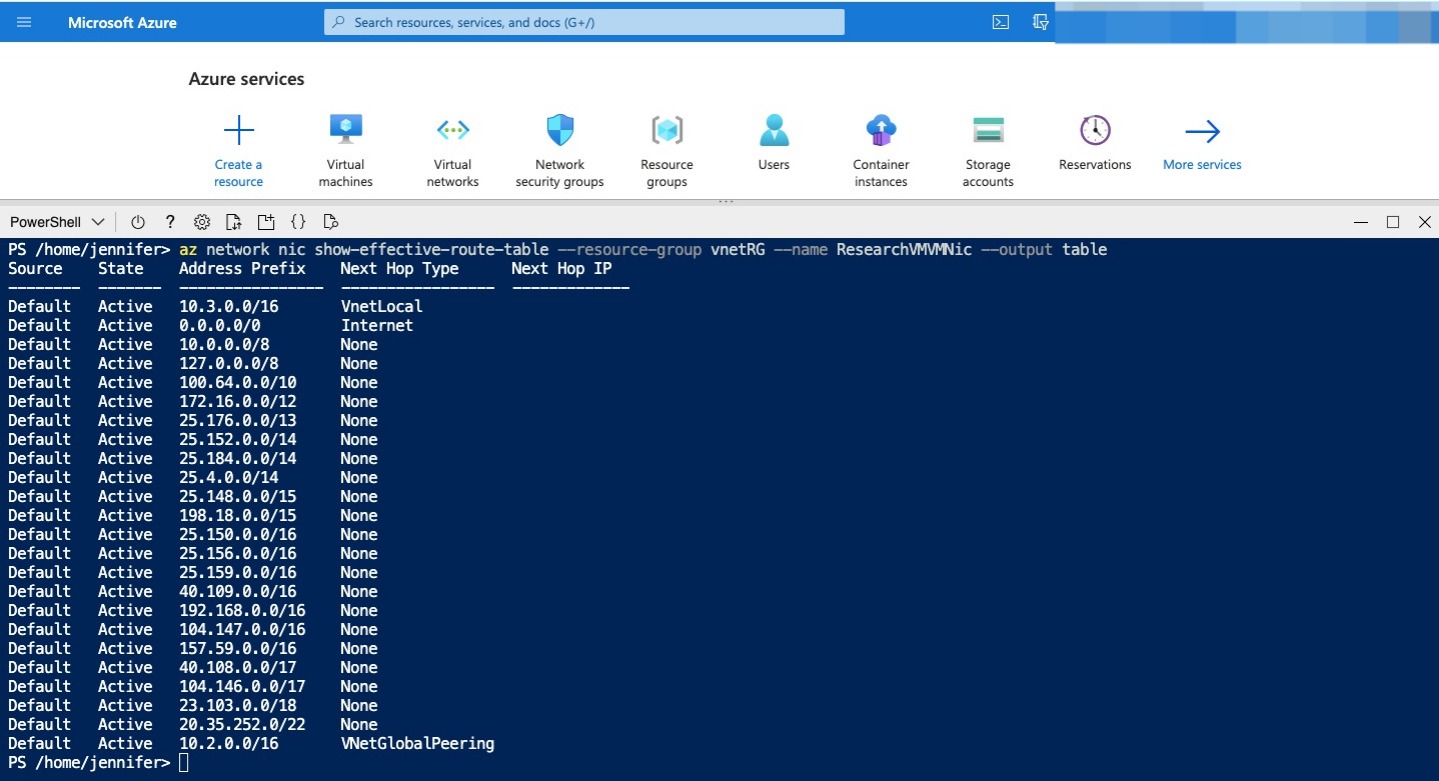
Run the following command to look at the routes for ResearchVM: Azure CLI
Copy
az network nic show-effective-route-table \
    --resource-group [ resource group name] \
    --name ResearchVMVMNic \
    --output table
The output table shows the effective routes for the VM’s network interface. For ResearchVMVMNic, you should have a route to 10.2.0.0/16 with a next hop type of VNetGlobalPeering. This is the network route for the peering connection from ResearchVNet to MarketingVNet.
Output
Now that your peering connections are configured, let’s take a look at how this affects the communication between VMs.
Verify virtual network peering by using SSH between Azure virtual machines
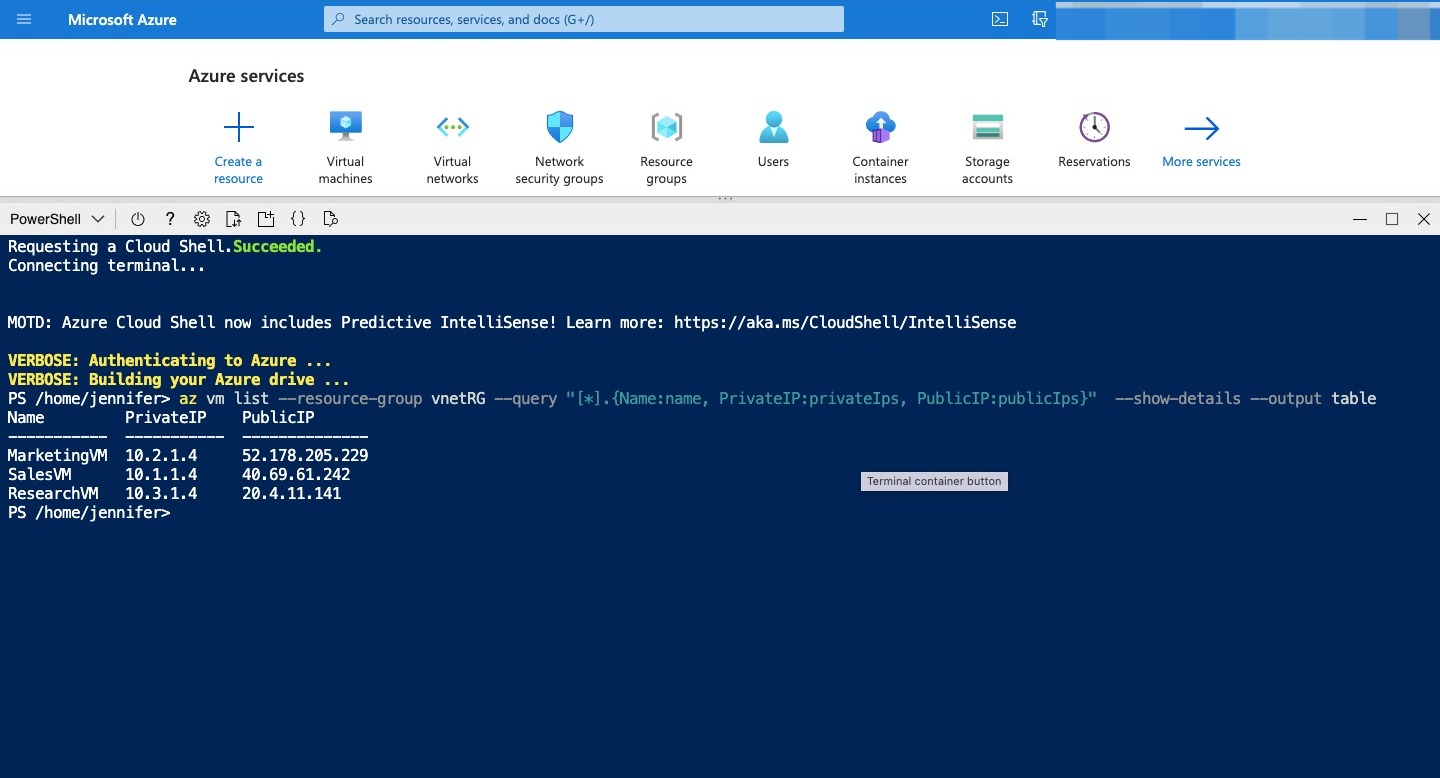
Lets confirm the connectivity across the peering connections. To do this, you’ll first create a connection from Azure Cloud Shell to a target VM’s public IP address. Then you’ll connect from the target VM to the destination VM by using the destination VM’s private IP address. Important to test the virtual network peering connection, connect to the private IP address assigned to each VM. To connect to your VMs, you’ll use SSH (Secure Shell) directly from Cloud Shell. When using SSH, you’ll first find the public IP addresses that are assigned to your test VMs. In Cloud Shell, run the following command to list the IP addresses you’ll use to connect to the VMs: Azure CLI
Copy
az vm list \
    --resource-group [ resource group name] \
    --query "[*].{Name:name, PrivateIP:privateIps, PublicIP:publicIps}" \
    --show-details \
    --output table
Record the output. You’ll need the IP addresses for the exercises in this unit.
Test connections from SalesVM
In the first test, you’ll use SSH in Cloud Shell to connect to the public IP address of SalesVM. You’ll then attempt to connect from SalesVM to MarketingVM and ResearchVM.
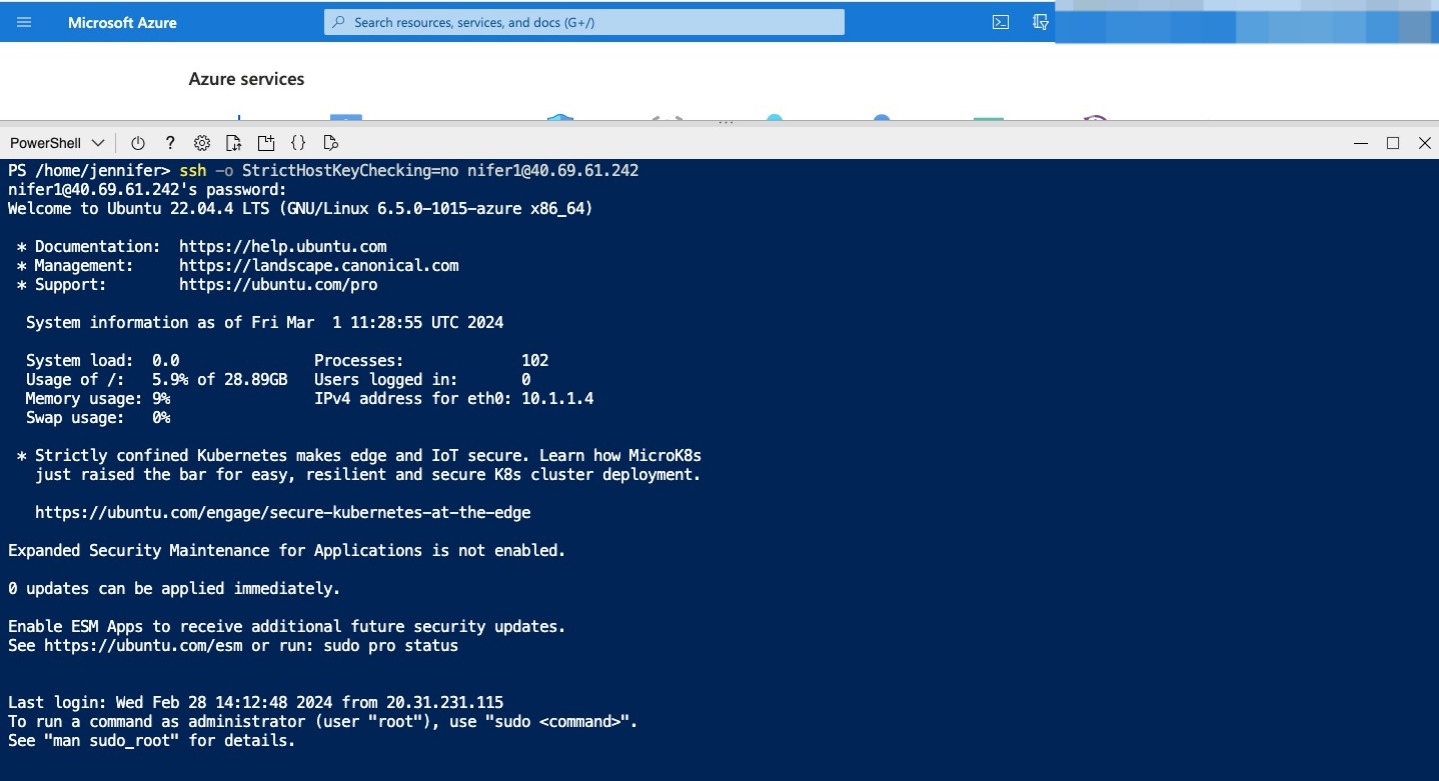
In Cloud Shell, run the following command, using SSH to connect to the public IP address of SalesVM. In the command, replace
Copy
[ssh -o StrictHostKeyChecking=no azureuser@<SalesVM public IP>]
Sign in with the password that you used to create the VM. The prompt now shows that you’re signed in to SalesVM.
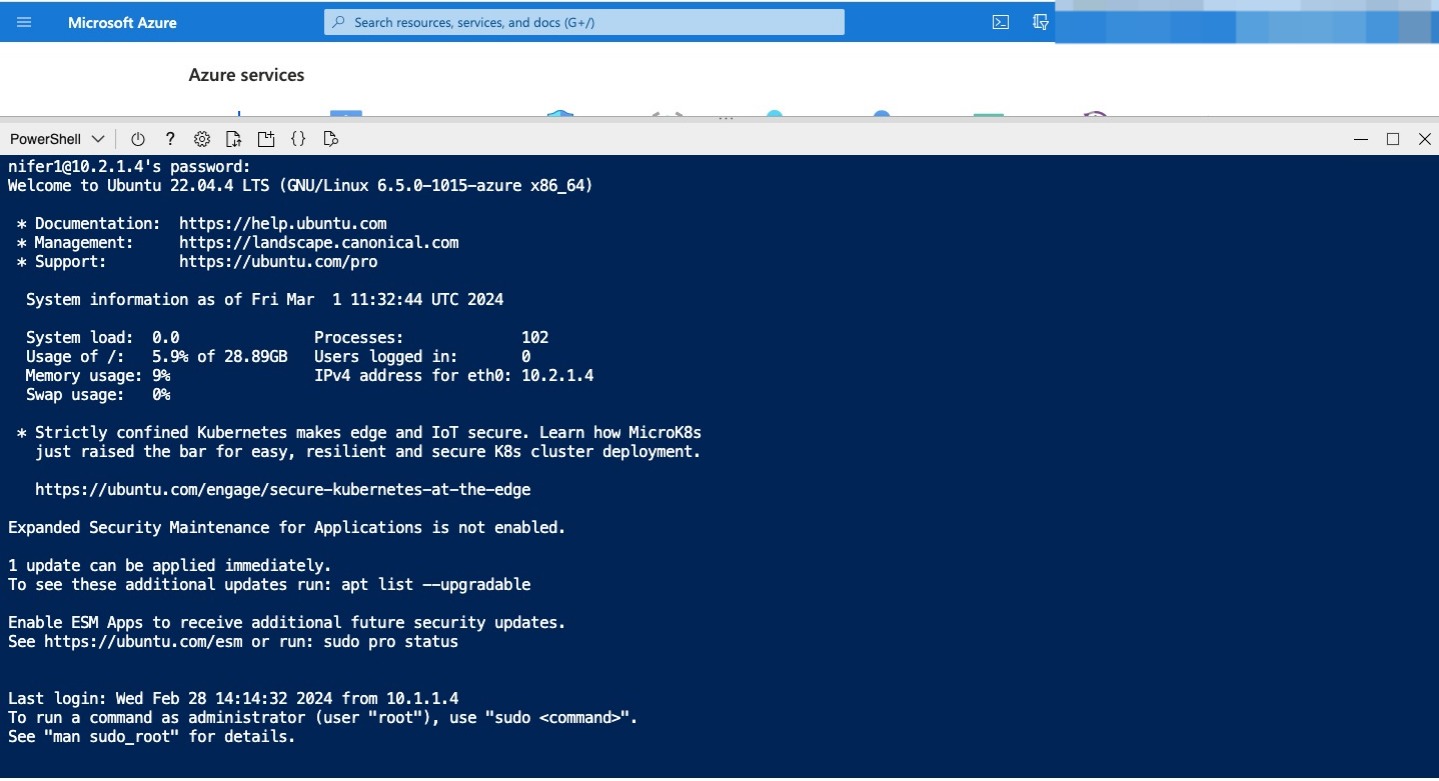
In Cloud Shell, run the following command, using SSH to connect to the private IP address of MarketingVM. In the command, replace
Copy
[ssh -o StrictHostKeyChecking=no azureuser@<MarketingVM private IP>]
The connection attempt should succeed because of the peering connection between the SalesVNet and MarketingVNet virtual networks.
Sign in by using the password you used to create the VM.
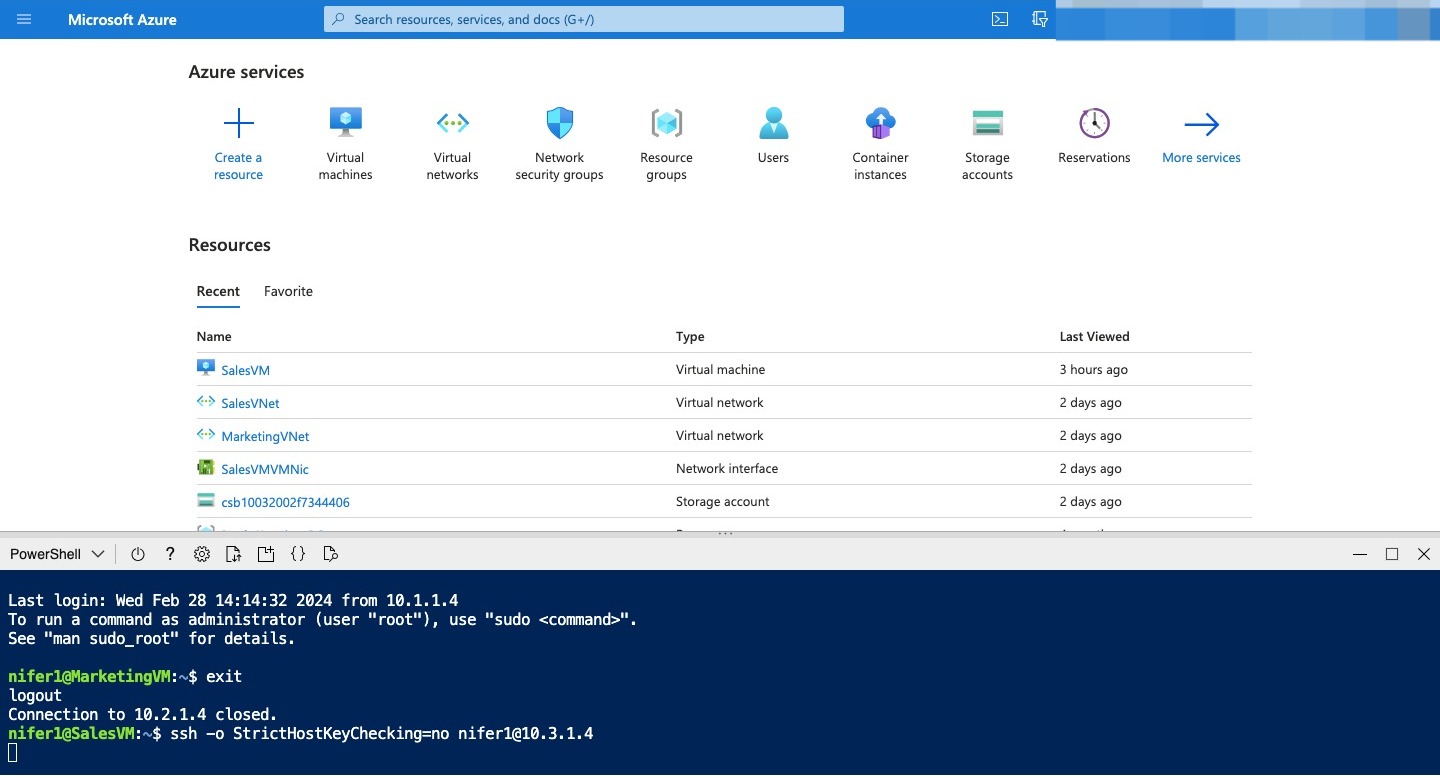
Enter exit to close this SSH session and return to the SalesVM prompt.
In Cloud Shell, run the following command, using SSH to connect to the private IP address of ResearchVM. In the command, replace
Copy
[ssh -o StrictHostKeyChecking=no azureuser@<ResearchVM private IP>]
The connection attempt should fail because there’s no peering connection between the SalesVNet and ResearchVNet virtual networks. Up to 60 seconds might pass before the connection attempt times out. To force the attempt to stop, use Ctrl+C.
 Enter exit to close the SSH session and return to Cloud Shell.
Test connections from ResearchVM
In the second test, you’ll use SSH in Cloud Shell to connect to the public IP address of ResearchVM. You’ll then attempt to connect from ResearchVM to MarketingVM and SalesVM.
In Cloud Shell, run the following command, using SSH to connect to the public IP address of ResearchVM. In the command, replace
Copy
[ssh -o StrictHostKeyChecking=no azureuser@<ResearchVM public IP>]
Sign in by using the password that you used to create the VM. The prompt now shows that you’re signed in to ResearchVM.
In Cloud Shell, run the following command, using SSH to connect to the private IP address of MarketingVM. In the command, replace
Copy
[ssh -o StrictHostKeyChecking=no azureuser@<MarketingVM private IP>]
The connection attempt should succeed because of the peering connection between the ResearchVNet and MarketingVNet virtual networks. Sign in by using the password you used to create the VM. Enter exit to close this SSH session and return to the ResearchVM prompt.
In Cloud Shell, run the following command, using SSH to connect to the private IP address of SalesVM. In the command, replace
Copy
[ssh -o StrictHostKeyChecking=no azureuser@<SalesVM private IP>]
The connection attempt should fail because there’s no peering connection between the ResearchVNet and SalesVNet virtual networks. Up to 60 seconds might pass before the connection attempt times out. To force the attempt to stop, use Ctrl+C. Enter exit to close the SSH session and return to Cloud Shell.
Test connections from Marketing VM
In the final test, you’ll use SSH in Cloud Shell to connect to the public IP address of MarketingVM. You’ll then attempt to connect from MarketingVM to ResearchVM and SalesVM.
In Cloud Shell, run the following command, using SSH to connect to the public IP address of MarketingVM. In the command, replace
Copy
[ssh -o StrictHostKeyChecking=no azureuser@<MarketingVM public IP>]
Sign in by using the password that you used to create the VM. The prompt shows that you’re signed in to MarketingVM.
In Cloud Shell, run the following command, using SSH to connect to the private IP address of ResearchVM. In the command, replace
Copy
[ssh -o StrictHostKeyChecking=no azureuser@<ResearchVM private IP>]
The connection attempt should succeed because of the peering connection between the MarketingVNet and ResearchVNet virtual networks. Sign in by using the password you used to create the VM. Enter exit to close this SSH session, and return to the MarketingVM prompt.
In Cloud Shell, run the following command, using SSH to connect to the private IP address of SalesVM. In the command, replace
Copy
[ssh -o StrictHostKeyChecking=no azureuser@<SalesVM private IP>]
The connection attempt should also succeed because there is a peering connection between the MarketingVNet and SalesVNet virtual networks.
Sign in by using the password you used to create the VM. Enter exit to close this SSH session, and return to the MarketingVM prompt. Enter exit to close the SSH session, and return to Cloud Shell.